Streamlining The Hardwood Floor Refinishing Process:
If you’re fortunate enough to have hardwood flooring, you possess an asset that can significantly enhance the value of your property in today’s competitive real estate market. However, if your hardwood floors need serious attention and you’re considering refinishing them, it’s crucial to understand that this undertaking is no small feat. Whether you plan to tackle the project yourself or enlist professional help, thorough preparation is key to ensuring a successful hardwood floor refinishing process. In this comprehensive guide, we’ll walk you through the essential steps to prepare for hardwood floor refinishing, making the entire process smoother and more manageable.
Pre-Treat Hardwood Floor Problem Areas
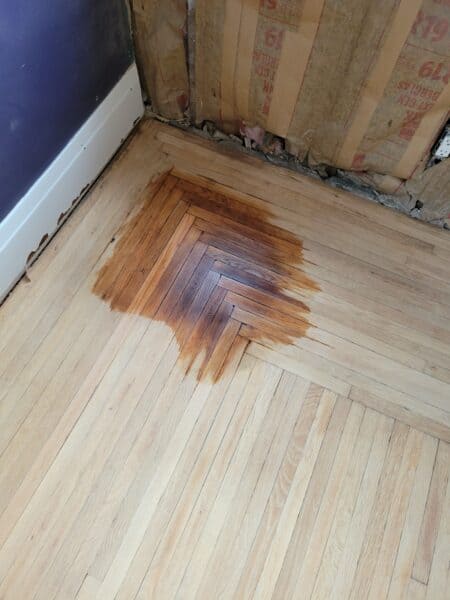
This situation usually only pertains to untreated wood. If you have taken up an old carpet and would like to revitalize the existing wood floor, you will need to evaluate any damage. Check all areas for stains. If you have pet urine or anything like that, you might need up to a couple of weeks of treating the area to get the stain out.
With pet stains, we recommend using a TSP (trisodium phosphate) cleaner to bring out the odor and a developer to lighten the stain. For the TSP, dilute it, apply it, and rinse the spot with water. For the developer, this might sound crazy, but you can get it from a salon beauty store. Pick up a 40 Clear Developer. It’s basically hydrogen peroxide and phosphoric acid.
By just applying the developer to the spot and letting it air dry several times, it should lighten the stain. Apply both solutions several times until you achieve the desired result. Be sure to use gloves when handling these chemicals.
For paint, we recommend painting thinner. After applying the paint thinner and letting sit for 5 minutes, make 100% that it is rinsed and wiped up. If it is not it can have an effect even after the finish is applied. This is a must to prepare for hardwood floor refinishing. Don’t make the mistake of thinking that the paint will just be sanded away. In certain circumstances, it can if it’s fresh and on top, but if it’s older paint and it’s embedded, make sure it’s all up before the job starts.
Pick Out a Stain For Your Flooring
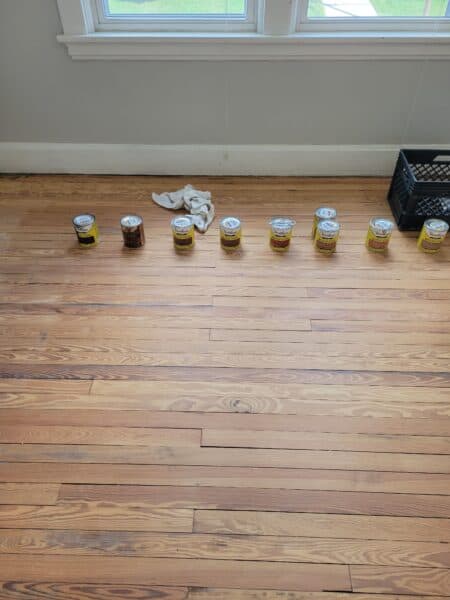
This step should be fun!
If you are having a hard time deciding what you want, use samples or try out a virtual tool. The future of technology has given us some fun innovative tools to virtually help with home improvement projects such as this floor visualizer! It will give you an idea of lighting and color ideas. We also help with choosing your ideal stain color.
Prepare the Area
On the day of refinishing, proper preparation of the work area is essential to ensure a smooth and efficient process. The room being refinished should be completely emptied of furniture and belongings, with adequate space provided for equipment and supplies. Plastic sheeting can be used to minimize dust and debris from spreading to adjacent rooms, although some level of containment should still be expected. Taking the time to prepare the area beforehand will contribute to a more organized and hassle-free refinishing experience.
Adjust the Temperature and Humidity
Maintaining optimal temperature and humidity levels during the refinishing process is crucial for achieving desirable results. Aim for a temperature of around 65 degrees Fahrenheit with humidity levels not exceeding 35%. These conditions are particularly important during the staining phase, as deviations in air quality can affect the application and drying of the stain. By controlling temperature and humidity, you’ll ensure a more consistent and professional finish on your hardwood floors.
After the Sanding
Be sure to get your vents cleaned out. Even if the sanding process did not seem to make a huge mess, there will probably be debris in your vent system. You will also want to dust all rooms on the entire floor. Even with the plastic sheeting, sawdust can find its way in!
When the Hardwood Floor Refinishing Job is Complete
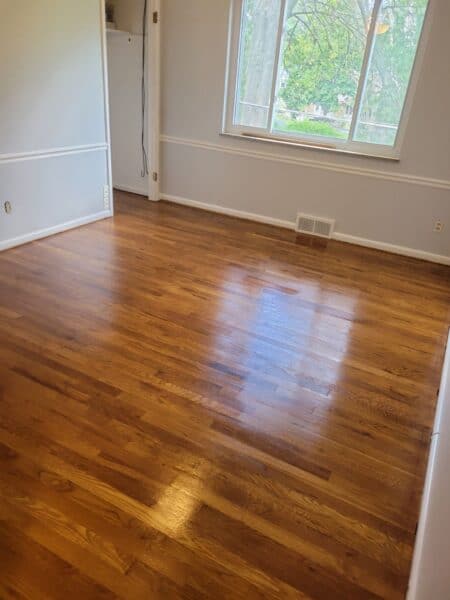
Once the hardwood floor refinishing process is complete, it’s essential to allow sufficient time for the poly finish to set before resuming normal activities. Typically, a waiting period of 1-2 full days is recommended to ensure optimal curing and durability of the finish. During this time, avoid placing heavy furniture directly on the floor and use furniture pads to prevent scratches and dents. Additionally, familiarize yourself with proper cleaning and maintenance techniques to preserve the beauty and longevity of your newly refinished hardwood floors.
Final Thoughts on How to Prepare for Hardwood Floor Refinishing
Having your hardwood floor refinished is exciting! True transformations take time and preparation. Your hardwood floors are no different. If it seems like a huge undertaking, it is. After the dust settles, you should be very happy with the results!
A nice refinished hardwood floor can raise the value of your home and create an inspiring space for you to enjoy!
At Olmec Reflections, we are dedicated to helping homeowners transform their hardwood floors with expert refinishing services. With years of experience and a commitment to quality craftsmanship, we take pride in delivering exceptional results that exceed our clients’ expectations.
Looking to get your floors refinished? Olmec Reflections would love to help you transform them. Contact the hardwood flooring experts today to book a free estimate!